
A shower pan leak test is one of the most important steps before installing new tile in your bathroom. In Clarksburg, MD, homeowners know that water damage can lead to costly repairs and mold issues. By performing a thorough shower pan leak test, you can catch potential leaks early and protect your investment. This proactive approach ensures your shower remains watertight and trouble-free for years to come.
Professional plumbers in Frederick, MD, often recommend a shower pan leak test before moving forward with tile installation. This test identifies any vulnerabilities in the shower base that could result in future leaks. Even a small leak can cause major issues if left unchecked beneath beautiful new tile. Early detection helps prevent headaches and expensive repairs down the road.
Understanding the basics of a shower pan leak test is essential for any bathroom renovation project. The process involves filling the shower pan with water and monitoring for any drops in level or visible leaks. It’s a simple but effective way to ensure your waterproofing efforts are successful. Reliable brands like Oatey and Sioux Chief offer quality products to support this crucial step.
Taking the time to complete a shower pan leak test gives homeowners peace of mind before the tiling process begins. This careful inspection helps maintain the integrity of your bathroom and protects the structure of your home. With the right preparation, you can enjoy a beautiful, functional shower space for years. Trusting experienced professionals ensures every detail is addressed and your project is built to last.
Why a Shower Pan Leak Test Is Essential
A shower pan leak test is essential because it helps prevent hidden water damage that can compromise your bathroom’s structure. Even a minor leak can lead to mold growth, wood rot, and costly repairs over time. In Clarksburg, MD, many homeowners have discovered issues only after tiles were installed, making repairs much more difficult. Testing before tiling is a smart step that protects your investment and your home.
The shower pan is your first line of defense against water escaping into the subfloor or surrounding walls. A shower pan leak test ensures that every seam, corner, and drain connection is watertight before you move forward. Skipping this test can result in undetected leaks that worsen over time. By catching problems early, you avoid the need for disruptive demolition later.
Professionals in Frederick, MD, understand that a proper shower pan leak test saves time and money in the long run. It also gives you confidence that your waterproofing system, whether installed with Oatey or Sioux Chief products, is performing as intended. This thorough check is a standard part of every successful bathroom renovation. It’s a step that should never be overlooked, no matter the size of the project.
A leak test also provides valuable documentation for future reference or resale. If you ever need to show proof of quality workmanship, having a record of your shower pan leak test can be helpful. This proactive approach reassures both homeowners and future buyers. Taking the time to test now means fewer worries and a longer-lasting, beautiful bathroom.
Tools and Materials Needed for Flood Testing
Preparing for a shower pan leak test in Clarksburg, MD, starts with gathering the right tools and materials. You’ll need a reliable test plug or inflatable test ball to seal the drain securely. A large bucket or hose is helpful for filling the shower pan with water. Keep a marker or tape handy to mark the water level for accurate monitoring.
Professional plumbers in Frederick, MD, often use quality brands like Oatey or Sioux Chief for test plugs and waterproofing components. A sturdy flashlight is essential for inspecting seams and corners for any signs of leakage. Having a clean towel nearby makes it easier to wipe up spills and check for damp spots. A simple notepad helps you document the results of your shower pan leak test.
It’s important to use materials that meet local plumbing codes and industry standards. Products from Home Depot or Ferguson often provide reliable solutions for homeowners and professionals alike. For accurate results, always use a test plug that fits your specific drain size. This ensures the shower pan leak test is both effective and safe.
Before starting, double-check that all seams, corners, and drain areas are clean and free from debris. This helps prevent false readings during the test. Having all your tools ready allows the process to go smoothly without interruption. With careful preparation, your shower pan leak test will help protect your bathroom renovation investment.
Step-by-Step Guide to Shower Pan Leak Test
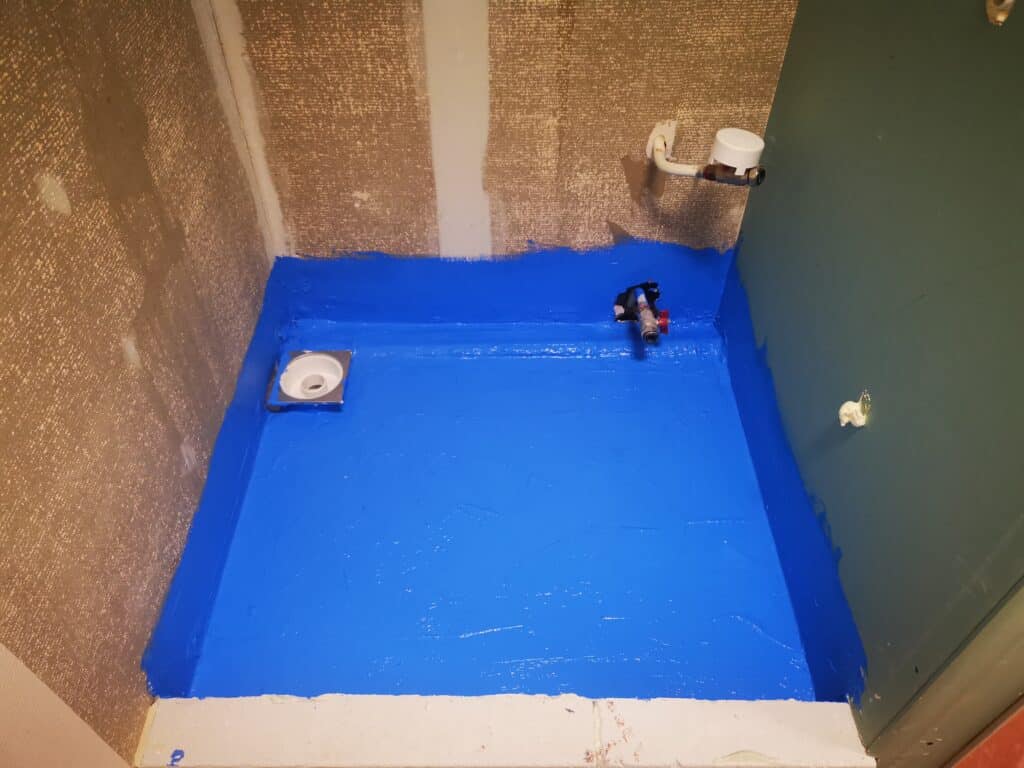
Begin your shower pan leak test by inserting a test plug or inflatable test ball into the drain opening. Fill the shower pan with water until it reaches just below the threshold. Use a marker or tape to note the water level for easy monitoring. Make sure the water covers all seams and corners for a thorough test.
Let the water sit for at least 24 hours to observe any changes in the level. Check around the pan and under the bathroom for signs of moisture or leaks. Use a flashlight to inspect every seam, especially near the drain and corners. If you notice any drop in water level, investigate further before proceeding.
After the waiting period, compare the current water level to your original mark. If the level remains steady, your shower pan leak test is successful. Remove the test plug and watch for any water escaping quickly, which could signal a hidden issue. Carefully dry the area and inspect for damp spots or pooling water.
If you discover a leak during your shower pan leak test, do not tile until repairs are made. Common failure points include seams, drain connections, and corners. Homeowners in Clarksburg, MD, and Frederick, MD, benefit from using trusted brands like Oatey and Sioux Chief for repairs. Address all leaks before moving forward to ensure a watertight and long-lasting shower installation.
Common Failure Points in Shower Pan Installations
During a shower pan leak test, several common failure points can cause water to escape unnoticed. Seams where the pan meets the walls are especially vulnerable if not sealed correctly. Drain connections are another frequent source of leaks, as improper tightening or misaligned gaskets allow water to seep through. Corners of the shower pan, where multiple seams meet, often require extra attention during installation.
In Clarksburg, MD, homeowners often find issues at the threshold, where the shower pan meets the bathroom floor. A small gap or crack here can let water escape and damage nearby flooring. In Frederick, MD, professional plumbers frequently encounter leaks around the drain flange if it’s not properly bonded. Using quality materials from brands like Oatey and Sioux Chief helps prevent these common problems.
Improperly installed waterproofing membranes can also lead to leaks during a shower pan leak test. If the membrane is punctured or not fully adhered, water may bypass the intended barrier. Overlapping seams that are not sealed tightly can allow water to travel underneath the pan. Careful inspection and use of reliable products from Home Depot or Ferguson can help avoid these issues.
When a leak is detected, immediate remediation is critical for a successful shower pan leak test. Resealing seams with compatible caulk or waterproofing tape is often effective. For persistent leaks, replacing the faulty section or redoing the drain connection may be necessary. Addressing these failure points before tiling ensures your shower will remain watertight and durable for years to come.

Signs of a Failed Shower Pan Leak Test
After completing a shower pan leak test, certain signs indicate the test has failed and repairs are needed. The most obvious clue is a noticeable drop in water level during the 24-hour monitoring period. Any dampness or water stains around the shower pan or on the subfloor below signal a problem. In Clarksburg, MD, homeowners sometimes notice musty odors or soft spots in flooring, both signs of hidden leaks.
Visible water pooling near seams, corners, or the drain area points to a compromised waterproofing system. During a shower pan leak test, even a small puddle outside the pan means water is escaping. In Frederick, MD, professionals often find moisture around the threshold or at the wall-to-pan junction. Soft grout or discolored caulk are additional signs that water is leaking past the intended barriers.
If you spot bubbles or discoloration in the waterproofing membrane, this often means water has penetrated beneath the surface. Listen for dripping sounds under the bathroom, as these can indicate slow leaks that may not appear immediately. Persistent dampness or mildew growth after a shower pan leak test is another warning sign. Immediate attention is needed to prevent further damage and costly repairs.
When any of these signs appear, do not proceed with tiling until the issue is resolved. Use trusted brands like Oatey or Sioux Chief for effective repairs to seams or drain connections. Resealing problem areas or replacing faulty components ensures your shower pan leak test will pass next time. Addressing these problems early helps protect your bathroom and maintain a watertight, long-lasting installation.
Immediate Actions After Detecting a Leak
If your shower pan leak test reveals a problem, act quickly to prevent further water damage. Start by draining the pan completely and drying all affected areas. In Clarksburg, MD, homeowners should inspect seams, corners, and the drain for obvious gaps or cracks. Use a flashlight to check for hidden moisture or soft spots around the shower base.
Next, remove any damaged caulk or sealant and clean the surfaces thoroughly. For small leaks, reseal seams using a waterproofing product from Oatey or Sioux Chief. In Frederick, MD, professionals often replace faulty drain gaskets or tighten connections to stop persistent leaks. Always allow new sealants to cure fully before retesting the shower pan leak test.
If the leak persists after basic repairs, consider removing a section of the shower pan for a closer inspection. Look for punctures, poorly adhered membranes, or misaligned drain flanges that could allow water to escape. Use quality materials from Home Depot or Ferguson to replace damaged components. Taking these steps ensures your next shower pan leak test will be successful.
Document each repair and retest the pan before moving forward with tile installation. This careful approach helps avoid future issues and protects your investment. A properly performed shower pan leak test gives you peace of mind and a watertight shower for years. Prompt action and thorough repairs are key to a lasting, beautiful bathroom renovation.
Remediation Options for Shower Pan Leaks
When a shower pan leak test reveals issues, several effective remediation options are available to restore watertight protection. Start with resealing seams and corners using high-quality waterproofing products from Oatey or Sioux Chief. For leaks at the drain, replacing gaskets or tightening connections often solves the problem. Always allow new sealants to cure fully before retesting.
If damage is more extensive, removing and replacing a section of the shower pan may be necessary. Inspect the waterproofing membrane for punctures or poor adhesion, and repair with compatible materials from Home Depot or Ferguson. In Clarksburg, MD, homeowners sometimes need to reinstall the drain flange or reinforce corners for added security. Carefully follow manufacturer instructions for each product to ensure lasting results.
For persistent leaks that resist simple fixes, consider a full shower pan replacement. This approach is common in Frederick, MD, where older installations may have outdated or damaged materials. Upgrading to modern components from brands like Delta or Kohler can enhance both durability and performance. Always perform a final shower pan leak test after any major repair or replacement.
Prevent future issues by documenting all repairs and keeping a record of your shower pan leak test results. Regular inspections after installation help catch minor problems early before they become serious. Investing in professional installation and quality materials ensures your shower remains watertight for years. With careful remediation, your bathroom renovation will stand the test of time.

Tips to Ensure a Successful Shower Pan Leak Test
To achieve the most accurate results from your shower pan leak test, always start with a clean and debris-free surface. Ensure the test plug fits securely in the drain, creating a watertight seal before filling the pan. Use a measuring tape or marker to track the water level precisely. This careful preparation makes it easier to spot even the smallest leaks.
Monitor the water level and surrounding areas throughout the 24-hour test period. Check seams, corners, and the drain area with a flashlight for any signs of moisture or drops in water level. In Clarksburg, MD, it helps to inspect the subfloor below the shower for hidden leaks. Early detection allows for prompt repairs, saving time and money.
Choose quality products from trusted brands like Oatey or Sioux Chief for sealing and repairs during your shower pan leak test. Allow all caulks and sealants to cure fully before retesting to ensure effectiveness. When in Frederick, MD, consider using materials from Home Depot or Ferguson for reliable results. Properly cured repairs prevent recurring leaks and ensure a watertight finish.
Document each step of your shower pan leak test, including preparation, observations, and any repairs made. Keeping detailed notes helps if you need future reference or proof of quality. Regular inspections after installation can catch minor issues before they become serious. With careful attention and the right materials, your shower will remain leak-free for years to come.
Frequently Asked Questions
What is a shower pan leak test and why is it important?
A shower pan leak test checks for water leaks before tile installation, ensuring the base is watertight and secure. This crucial step helps prevent future water damage, mold growth, and costly repairs in your Clarksburg home. During the process, plumbers often use quality brands like Oatey or Sioux Chief for reliable results. By identifying leaks early, you protect your investment and enjoy peace of mind with a properly sealed shower pan.
How do I perform a shower pan leak test before tiling?
To perform a shower pan leak test, first plug the drain with an Oatey or Sioux Chief test plug. Fill the shower pan with water, ensuring it reaches just below the threshold. Let the water sit for at least 24 hours while checking for drops in the water level. If you notice water loss or dampness outside the pan, address leaks before moving forward with tiling.
What materials are needed to test a shower pan for leaks?
To complete a shower pan leak test, gather a reliable test plug like Sioux Chief or Oatey, a water source, and a bucket. You will also need a measuring tape to monitor water levels and a marker to note the starting point. Keep towels handy for cleanup and a flashlight to inspect for leaks around the pan edges. These basic materials help ensure your shower pan leak test is accurate and effective before tiling begins.
How long should I wait before checking for leaks in the shower pan?
After filling the shower pan, wait at least 24 hours before inspecting for leaks. This timeframe allows water to reveal any hidden issues. Monitor the water level and check for damp spots around the pan during this period. A thorough shower pan leak test ensures your Clarksburg shower is watertight before tiling begins.
What are common signs of a failed shower pan leak test?
Visible water outside the shower pan, damp subfloor, or stained ceilings below are clear signs of a failed shower pan leak test. You may also notice a drop in water level inside the pan after 24 hours. Persistent moisture or musty odors around the shower area often indicate leaks that need prompt attention. Address these issues quickly to prevent further water damage before tiling your Clarksburg shower.