

Toilet flange repair can often seem daunting to homeowners. However, with the right guidance, it’s a task that can be tackled with confidence. Whether you’re in Clarksburg, MD, or the surrounding areas like Kensington, MD, and Bethesda, MD, understanding the basics of this repair is crucial. This article aims to demystify the process, making it accessible to all.
The causes of flange failures are varied, ranging from wear and tear to improper installation. Identifying the root cause is the first step toward a successful toilet flange repair. Residents in these communities have faced such challenges, and solutions are within reach. With this knowledge, the path to repair becomes clearer and less intimidating.
Before diving into the repair process, knowing what tools you’ll need is essential. The list isn’t long or overly complicated, which is good news for DIY enthusiasts. From wrenches to replacement parts, preparing your toolkit in advance will make the repair smoother. This preparation ensures that the repair process won’t be halted by missing tools.
Finally, understanding the step-by-step basics of toilet flange repair can save homeowners time and money. This guide will walk you through each phase, ensuring clarity and efficiency. By following these straightforward steps, you’ll be well on your way to fixing the issue at hand. This approach not only solves the immediate problem but also empowers homeowners with valuable plumbing skills.
Understanding Toilet Flange and Its Importance
Understanding the role of a toilet flange is crucial in grasping why its repair is so important. Essentially, this flange connects the toilet to the drainpipe in the floor, ensuring a leak-free and solid foundation for your toilet. When this component fails, it can lead to water damage, unpleasant odors, and an unstable toilet. Homeowners in Kensington, MD, and beyond value the importance of maintaining this key piece to avoid costly damages.
Toilet flange repair becomes necessary when you notice your toilet rocking or leaking at the base. These are telltale signs that the flange may be broken or deteriorating. Such issues often stem from corrosion over time or a previous installation that wasn’t done correctly. Residents in Bethesda, MD, have experienced these symptoms and recognize the urgency in addressing them promptly.
The good news is that repairing a toilet flange doesn’t require a plumber’s license. With a few basic tools like a wrench, screwdriver, and a new flange, most homeowners can undertake this task. It’s about removing the toilet, replacing or repairing the damaged flange, and then reinstalling the toilet. This process can prevent further damage and restore the proper function of your toilet.
By tackling toilet flange repair, homeowners not only save on potential plumbing bills but also gain a deeper understanding of their home’s plumbing system. This DIY project can be a rewarding experience, offering a sense of accomplishment and the confidence to handle future repairs. Remember, the key to a successful repair lies in identifying the problem early and having the right tools and parts on hand.
Common Causes of Toilet Flange Failure
Toilet flange failures can often start with simple signs that homeowners might overlook. For instance, a rocking toilet or water on the bathroom floor near the base can indicate a problem. These issues usually stem from a broken or deteriorated flange, which is crucial for a tight seal between the toilet and the drainage system. Identifying these early signs in places like Kensington, MD, can prevent more significant problems down the line.
One common cause of toilet flange failure is corrosion, which affects metal flanges over time. Corrosion can weaken the flange, leading to leaks and instability in the toilet’s foundation. This is particularly relevant in older homes in Bethesda, MD, where plumbing systems may not have been updated for years. Homeowners should regularly inspect their flanges, especially if they live in areas with hard water, which can accelerate corrosion.
Another reason for flange failure is improper installation, which can occur if the flange is not securely fastened to the floor or if the wrong size is used. This can cause the toilet to shift, breaking the seal and leading to leaks. Ensuring that the flange is installed correctly from the start can save homeowners in Clarksburg, MD, time and money on future repairs. It’s a critical step that requires attention to detail.
Lastly, the impact of heavy usage cannot be underestimated. In homes with a lot of foot traffic, the constant pressure on toilets can lead to wear and tear on the flange. This is why it’s essential for homeowners to conduct regular maintenance checks. By staying proactive, residents can extend the life of their plumbing fixtures and avoid the need for emergency repairs.
Tools and Materials Needed for Toilet Flange Repair
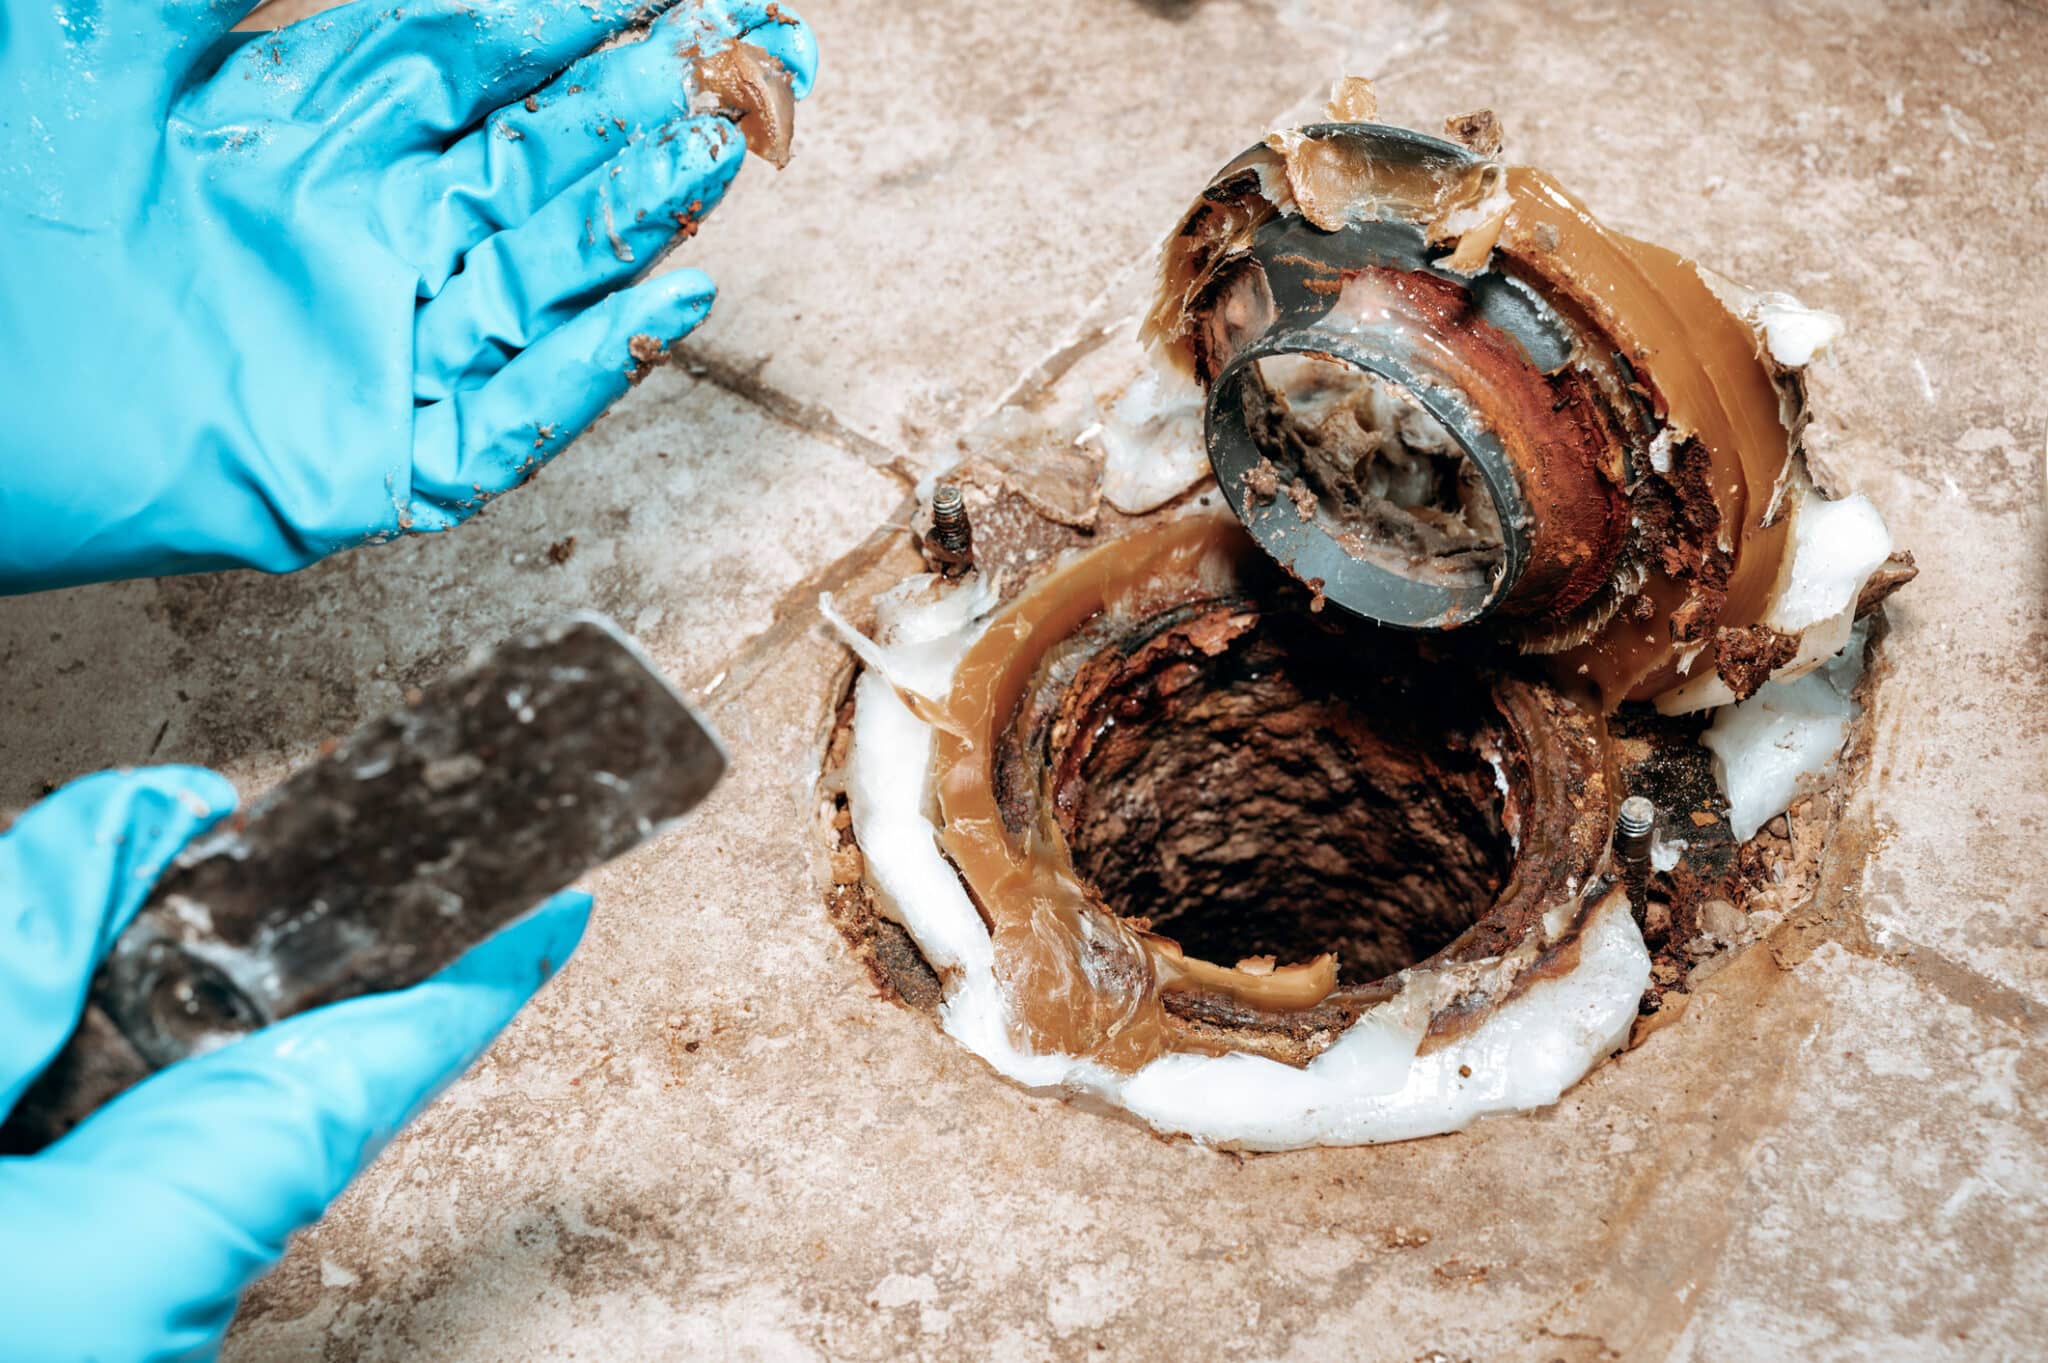
Before embarking on toilet flange repair, assembling the right tools and materials is essential. You’ll need a wrench, screwdriver, putty knife, and a replacement flange. Additionally, having a pair of gloves and some old towels or rags can help keep the area clean. This preparation ensures that the repair process goes smoothly without unnecessary interruptions.
Starting the repair process requires first turning off the water supply to the toilet. This step is crucial to avoid any water mess during the repair. After draining the toilet tank and bowl, the next step involves unscrewing the toilet from the floor. Carefully lifting and moving the toilet aside will then expose the damaged flange, ready for inspection and replacement.
With the old flange removed, cleaning the area around the drainpipe is necessary before installing the new flange. Using the putty knife, scrape off any old wax seal or debris to ensure a clean surface for a tight seal. Installing the new flange correctly is critical, it should sit flush with the floor and be securely fastened to prevent future leaks or movement.
Finally, reinstalling the toilet is the last step in the repair process. Placing a new wax ring on the flange before setting the toilet back ensures a watertight seal. Tightening the bolts evenly, without overtightening, will secure the toilet in place. Turning the water back on and testing for leaks completes the toilet flange repair, restoring functionality and peace of mind.
Preparing for Toilet Flange Repair: Steps Before You Start
When preparing for toilet flange repair, it’s crucial to first understand the problem and assess the damage. This involves inspecting the flange for cracks, breaks, or corrosion. Homeowners in Kensington, MD, find that catching these issues early can simplify the repair process. Identifying the exact cause of the failure ensures that you can select the appropriate replacement parts.
Next, gather all necessary tools and materials before starting the repair. This step cannot be overstated, as having everything on hand minimizes disruptions. You’ll need a few basic tools such as a wrench, screwdriver, and a new flange. Residents in Bethesda, MD, often keep these items readily available to tackle such repairs without delay.
Creating a clean workspace is another important preparation step. Clearing the area around the toilet ensures safety and efficiency during the repair. Use old towels or rags to soak up any residual water, and wear gloves to protect your hands. This cleanliness is essential for a successful repair, preventing any contamination or injury.
Finally, reviewing the repair steps thoroughly before beginning will boost your confidence. Understanding the sequence of actions, from turning off the water to replacing the flange, ensures a smoother process. This preparation allows homeowners to approach toilet flange repair with a clear plan, reducing the chance of mistakes and ensuring a proper fix.
Step-by-Step Guide to Toilet Flange Repair
Starting toilet flange repair begins with removing the toilet to access the damaged flange. First, ensure the water supply is shut off to prevent any spills. Then, unscrew and gently lift the toilet, placing it aside on an old towel or rag. This exposes the flange, allowing for a thorough inspection and preparation for the new installation.
Once the toilet is removed, the next step involves cleaning the area around the old flange. Use a putty knife to scrape away the old wax seal and any debris, ensuring a clean surface for the new flange. A clean base is crucial for a secure and leak-free installation. Residents of Kensington, MD, understand that a meticulous cleaning process is key to a successful repair.
Installing the new flange is a critical step in toilet flange repair. Position the new flange over the drainpipe, making sure it sits flush with the floor. Secure it with screws to prevent any movement, a step that guarantees a solid foundation for the toilet. This precision ensures that future leaks or instability are avoided, maintaining the integrity of the bathroom’s plumbing.
Finally, reinstall the toilet by positioning it over the new flange and pressing down to form a tight seal with a new wax ring. Secure the toilet to the floor with bolts, ensuring it’s snug but not overtightened to avoid cracking the base. Turn the water supply back on and flush the toilet a few times to test for leaks. Homeowners in Bethesda, MD, can now enjoy the peace of mind that comes with a properly executed toilet flange repair.
Sealing and Testing Your Toilet Flange Repair
After reinstalling the toilet, the next crucial step in toilet flange repair is ensuring a proper seal. This involves applying a new wax ring or a wax-free seal between the toilet base and the flange. A secure seal prevents water leaks and odors from escaping, crucial for maintaining a clean and healthy bathroom environment. Homeowners in Kensington, MD, appreciate the importance of this step for ensuring their repair efforts are successful and long-lasting.
Testing the repair is equally important to confirm the effectiveness of your work. Once the toilet is secured and the water supply is reconnected, run several flush tests. Observing for leaks around the base or any signs of water on the floor will help identify if the seal is intact. Residents in Bethesda, MD, know that diligent testing can save time and prevent potential water damage.
If leaks are detected during testing, it’s essential to address them immediately. This might involve tightening the bolts a bit more or reseating the toilet to improve the seal. However, it’s crucial not to overtighten, as this could crack the toilet base, leading to more significant issues. A balanced approach ensures the toilet is stable and leak-free, a testament to a job well done.
Finally, maintaining your toilet flange after repair extends its lifespan and prevents future failures. Regular inspections and quick responses to any signs of wear or leaks can keep your bathroom in top condition. For homeowners, understanding and implementing these maintenance practices mean fewer worries and more confidence in their toilet flange repair.

Tips for Maintaining Your Toilet Flange Post-Repair
Maintaining your toilet flange after repair is crucial for ensuring its longevity and preventing future issues. Regular inspections play a key role in this process. Homeowners in Kensington, MD, find that checking the flange for signs of wear or leaks every few months can prevent minor issues from becoming major problems. This proactive approach helps keep the toilet stable and leak-free.
Another important tip is to be mindful of what gets flushed down the toilet. Avoid flushing items that could damage the plumbing or the flange. Residents in Bethesda, MD, understand that items like paper towels, wipes, and feminine hygiene products can cause blockages. These blockages put unnecessary pressure on the flange, leading to potential damage.
Responding quickly to any signs of a leak or instability is also vital. If you notice water on the floor around the toilet or if the toilet starts rocking, it’s time to check the flange. Addressing these issues promptly can save you from more complicated and expensive repairs down the line. It’s all about catching and fixing problems early to maintain a healthy plumbing system.
Lastly, don’t hesitate to seek professional help if you’re unsure about a repair or maintenance task. Sometimes, a problem might be more complex than it appears. Professionals can offer advice or step in when a repair is beyond your skill set. This ensures that your toilet flange repair is done correctly, providing peace of mind and preventing future issues.
When to Call a Professional for Toilet Flange Repair
While many homeowners in Kensington, MD, feel confident tackling toilet flange repair, certain situations call for a professional plumber. If the damage extends beyond the flange to the surrounding plumbing or floor, expert intervention is necessary. Professionals have the tools and expertise to address complex issues that DIY methods can’t fix. Recognizing when the problem is out of your depth is crucial for preventing further damage.
In Bethesda, MD, homeowners should also consider calling a professional if they’ve attempted a repair and it hasn’t resolved the issue. Persistent leaks or instability after a repair attempt indicate that there may be underlying problems. A professional plumber can diagnose and solve these issues, ensuring the repair is thorough and lasting. This step can save time and money in the long run by avoiding repeated attempts and potential water damage.
Another scenario where professional help is advisable is when dealing with older plumbing systems. These systems may have components that are outdated or not up to current standards. Professionals can recommend upgrades or replacements that improve the system’s efficiency and reliability. They ensure that repairs integrate seamlessly with existing plumbing, maintaining the integrity of your home’s infrastructure.
Lastly, for homeowners who are not comfortable with the repair process or lack the necessary tools, seeking professional help is the best course of action. Attempting a repair without the proper knowledge or equipment can lead to mistakes that might be costly to rectify. A professional plumber guarantees that the toilet flange repair is done correctly the first time, offering peace of mind and ensuring the bathroom returns to its optimal function.
Frequently Asked Questions
What tools are needed for toilet flange repair?
For toilet flange repair, you’ll need a few key tools. A wrench and screwdriver are essential for removing and tightening parts. A hacksaw might be needed to trim the flange to fit. Lastly, don’t forget a new wax ring to ensure a watertight seal.
How do I know if my toilet flange needs repair?
To spot a toilet flange in need of repair, watch for water leaks around the toilet base. A rocking toilet or unpleasant odors can also signal trouble. These issues often point to a broken or loose flange. Addressing toilet flange repair promptly can prevent water damage and maintain bathroom hygiene.
Can I repair a toilet flange myself?
Yes, you can tackle toilet flange repair on your own with the right tools and a bit of know-how. First, ensure you have all the necessary equipment as outlined in our guide. Then, carefully follow the step-by-step instructions to remove the old flange and install the new one. Remember, patience and precision are key to ensuring a successful repair and preventing future leaks.
What are the steps for toilet flange repair?
First, turn off the water supply to your toilet to prevent any leaks during repair. Next, remove the toilet to access the damaged flange. Carefully replace or repair the flange, ensuring it’s securely fastened to the floor. Finally, reinstall the toilet with a new wax ring, checking for stability and leaks to complete your toilet flange repair.
How long does a toilet flange repair take?
A toilet flange repair usually takes a few hours to complete. This includes the time needed to remove the toilet, fix or replace the flange, and reinstall the toilet. For beginners, it might take a bit longer as you get familiar with the steps. Remember, taking your time ensures a thorough and leak-free repair.